Fixer
New! How to automatically right-size pricey GPU instances
CloudFix automatically right-sizes GPU instances on AWS. Identify overprovisioned GPU instances running ML and AI workloads and optimize for cost savings.

We’re really hoping to make a dent in customers’ GPU expenditure so they can allocate that to more innovation, more AI and ML workloads, and more higher order services that provide so much value.
– Rahul Subramaniam, Founder of CloudFix, on the new GPU right-sizing fixer
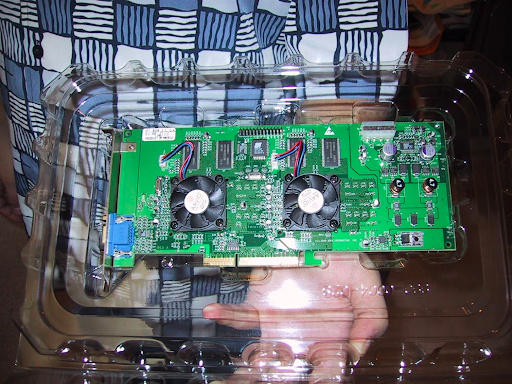
Choosing a GPU has always been about trade-offs: you want to make sure it meets your requirements, that it complements the rest of the system, and that it’s a good value. This is slightly cringe worthy (check out that shirt), but here is me in 1999 showing the GPU in my computer build. That GPU was the last of the infamous Voodoo graphics cards. I remember comparing these to the NVIDIA GeForce cards using an Excel sheet. Looking back, that was a real turning point for GPUs, as NVIDIA soon became dominant in that space.

As the expression goes, some things don’t change… here we are, 25 years later, still worried about the price/performance of GPUs! These days, however, we have some awesome tools to help us make the choice (sorry, Excel.) Plus, because we’re now dealing with the cloud, we aren’t locked into that choice, but can change our instance type on demand.
With that introduction, drumroll please…
We are very excited to announce a brand-new CloudFix fixer: right-sizing GPU instances. If you have a G4dn or P3 instance, these instances can now be automatically resized in a way that still maintains performance guarantees. Here’s our founder Rahul Subramaniam on this powerful new feature:
Why did we prioritize adding this fixer? In our current age of generative AI, there’s more demand than ever for GPU instances. The industry is consuming GPUs as fast as they can be produced. GPUs are an exciting tool to add to the toolbox – but they’re also pricey. As more businesses start to use them, we want to make sure that you’re controlling costs while taking advantage of these instances’ power.
Let’s look at how GPU costs add up, what you can do about it manually, and of course, how to right-size GPU instances easily and automatically with CloudFix.
Table of Contents
- GPUs: Powerful, performant, and pricey
- Meet the Compute Optimizer optimization engine
- Four prerequisites for right-sizing GPU instances
- How to right-size GPU instances
- Right-size GPU instances automatically with CloudFix
1. GPUs: Powerful, performant, and pricey
First, some context. GPUs are “Graphics Processing Units” and were originally designed to do exactly that. Gamers, video editors, and 3D artists drove the demand for these processors for their graphics capabilities. Young me (pictured above) got that GPU to play Descent 3 and Age of Empires II.
However, folks soon discovered that GPUs are extremely efficient at working through huge amounts of numerical calculations very quickly, and large-scale financial, chemical, and aerospace calculations began to leverage them. When the machine learning / AI revolution hit, it kickstarted the current run on GPUs, and they found another role powering the large calculations necessary in machine learning and AI.
GPU instances are on the higher end of the price spectrum. (Their cost, combined with their current popularity, is one of the reasons we’re so excited about this fixer.) With G4dn and P4 instances, there are a variety of sizes, and therefore prices, available.
Instance family | Instance size | On-Demand hourly rate | vCPU | GPU | Memory | Storage | Network performance |
g4dn | xlarge | $0.53 | 4 | 1x NVIDIA T4 | 16 GiB | 125 GB NVMe SSD | Up to 25 Gigabit |
2xlarge | $0.75 | 8 | 1x NVIDIA T4 | 32 GiB | 225 GB NVMe SSD | Up to 25 Gigabit | |
4xlarge | $1.20 | 16 | 1x NVIDIA T4 | 64 GiB | 225 GB NVMe SSD | Up to 25 Gigabit | |
8xlarge | $2.18 | 32 | 1x NVIDIA T4 | 128 GiB | 900 GB NVMe SSD | 50 Gigabit | |
12xlarge | $3.91 | 48 | 4x NVIDIA T4 | 192 GiB | 900 GB NVMe SSD | 50 Gigabit | |
16xlarge | $4.35 | 64 | 1x NVIDIA T4 | 256 GiB | 900 GB NVMe SSD | 50 Gigabit | |
metal | $7.82 | 96 | 8x NVIDIA T4 | 384 GiB | 2 x 900 GB NVMe SSD | 100 Gigabit | |
p3 | 2xlarge | $3.06 | 8 | 1x NVIDIA V100 | 61 GiB | EBS Only | Up to 10 Gigabit |
8xlarge | $12.24 | 32 | 4x NVIDIA V100 | 244 GiB | EBS Only | 10 Gigabit | |
16xlarge | $24.48 | 64 | 8x NVIDIA V100 | 488 GiB | EBS Only | 25 Gigabit |
As you can see, there are only 3 P3 instance sizes: 2xlarge, 8xlarge, and 16xlarge, with the largest containing 8x NVIDIA V100 GPUs. With the P3, vCPU, GPU, memory, and network performance all increase with instance size and price.
In contrast, g4dns are a more complex offering. Most sizes have a single GPU, but the 12xlarge has four and the metal has eight! This makes the price/performance decision for the g4dn more complicated.
If the GPU portion of the workload is perfectly suited to a single T4 GPU, you (or, as we go into below, Compute Optimizer) still have to consider other factors like CPU, memory, and network performance. For example, look at the xlarge, 2xlarge, 4xlarge, and 8xlarge variants of the g4dn. In terms of GPU, they have the same hardware: a single NVIDIA T4. Where they differ is in vCPU and RAM. With GPU workloads, the rest of the system is responsible for orchestrating data into and out of the GPU, essentially “feeding” the GPU. These factors are where right-sizing can typically take place – it’s not necessarily about resizing the GPU itself, but the GPU-enabled EC2 instance as a whole.
But that’s not all! To further complicate the optimization issue, the ideal workload profile of GPUs is very different to CPUs. With CPUs, we would like a steady-state utilization of 30-40% with occasional bursts past 70%. GPUs, on the other hand, are built for sustained 100% usage. Here’s Rick Ochs, Senior Manager of Cloud Optimization at AWS, on how GPU utilization differs from its counterparts:
As Rick said, “100% utilization is a happy place to be in.” It means we can get full value from our GPU investment – but we also want to make sure that as always, we’re only paying for what we need.
2. Meet the Compute Optimizer optimization engine
Fortunately, the good folks at AWS recently made it much easier for us to do exactly that (pay for only the GPU that we need, that is.)
The heavy lifting is done by our old friend Compute Optimizer, specifically the new GPU Instance Resizing feature. In CloudFix, it works similarly to the EC2 Low-Risk Right-Sizing Finder-Fixer, which makes sense since that fixer is also powered by Compute Optimizer. Here’s Rick again, with a bit more info on this exciting new capability:
As Rick mentions, the Compute Optimizer optimization engine can now make use of data supplied by the NVIDIA driver for the CloudWatch agent to make right-sizing recommendations. The GPU optimizer starts with the G4dn and P3 instances, for very intentional reasons. Here’s why:
3. Four prerequisites for right-sizing GPU instances
Let’s recap: We know that GPU pricing is hefty and complex, with a number of variables. We know in general that it’s easy to just choose a big instance so you’re confident that you have plenty of power, and then keep paying for it as workloads change over time, which results in overprovisioning and overpaying. And we know that Compute Optimizer now has an awesome tool that simplifies right-sizing GPU instances.
Now we just need to know how to go about it.
As with all CloudFix fixes, there’s no “secret formula” to what we’re doing. We just look at what AWS recommends and make it straightforward to implement. This fix is no different. The most important thing here is getting the prerequisites installed, which are:
- Enable Compute Optimizer
- Install the CloudWatch agent
- Make sure NVIDIA driver is installed, and configure CloudWatch agent to collect NVIDIA metrics
- Validate that the required metrics are being monitored
3.1 Enable Compute Optimizer
To enable Compute Optimizer, head straight to the Getting Started with AWS Compute Optimizer guide. This is your starting point.
If you’re using a management account of an organization, then in the majority of cases you should enable Compute Optimizer for all member accounts of the organization. This can be done from the Compute Optimizer Console or the command line, for a single account or for the whole organization at once.
Once you’ve done this, it may take 24 hours before you start to receive recommendations.
3.2 Install the CloudWatch agent
The next step is to install the CloudWatch agent. There are some metrics available to Compute Optimizer without CloudWatch agent, but by far the most important thing you can do for Compute Optimizer is to install the CloudWatch agent and enable memory metrics for all instances. Additionally, GPU instances will need the NVIDIA driver to be configured to collect NVIDIA metrics.
To learn more about CloudWatch and for detailed instructions on installing the CloudWatch agent, see our AWS Foundational Skills: CloudWatch blog post. Once the agent is installed, memory utilization will automatically be monitored, and this will drastically improve the recommendation quality of Compute Optimizer. See this section of the Compute Optimizer documentation for details.
3.3 Confirm the NVIDIA driver is installed and configure the CloudWatch agent
For Compute Optimizer to work with GPU instances, it needs to have detailed information about how the GPU is operating. Compute Optimizer gets this detailed information from the GPU via the NVIDIA GPU metrics. These include quantities such as memory usage, GPU kernel usage, power draw, memory clock speed, and more. In order to extract this information from the GPU, the NVIDIA driver must be installed.
If you’ve already been using the GPU, such as for CUDA-powered calculations, then it is highly likely that the NVIDIA driver is already installed. Otherwise, you wouldn’t be able to utilize the GPU. For starting a new project, you can use an AMI that already has the NVIDIA driver installed or, if you want to start with a from-scratch custom AMI, you will have to download and install the driver from NVIDIA itself.
Once you have both the CloudWatch agent and the NVIDIA driver installed and running, update the CloudWatch agent configuration to collect the GPU metrics. The Collect NVIDIA GPU Metrics page in the AWS documentation lists them and shows how to add them to the agent configuration.
To update the CloudWatch agent configuration across your fleet, use AWS Systems Manager. See our AWS Foundational Skills: Systems Manager guide for details.
3.4 Validate that the metrics are being monitored
Here at CloudFix, we’re big fans of validation. In this case, we want to make sure that the GPU metrics are actually arriving in CloudWatch for every GPU instance. If an instance is missing from CloudWatch, Compute Optimizer can’t make a GPU recommendation for it. Make sure that every instance is covered, and you’ll be in good shape.
4. How to right-size GPU instances
Now that we have all of our ducks in a row, let’s get down to business and right-size some GPU instances.
The currently supported instance types are the p3 and g4dn. Once the prerequisites are in place, Compute Optimizer evaluates each eligible instance and tells you whether it is overprovisioned, underprovisioned, or optimized, along with the reason (for example, too much CPU, memory, GPU, or GPU memory), a suggested instance type, the estimated monthly savings, and a performance risk rating. Pulling this together across many accounts and instances is a lot of work, and it works much like our EC2 Right-Sizing finder/fixer does for general-purpose instances.
If a recommendation is rated low risk, you should go for it! You will save money, and the Compute Optimizer team has worked very hard to ensure that you do not sacrifice performance in the process. Changing an instance type means stopping the instance, changing its type, and starting it again, so you may want to have a process in place for retyping instances (for example, how to properly stop running jobs first).
5. Right-size GPU instances automatically with CloudFix
Huge shoutout to Compute Optimizer – it’s such a powerful tool that makes it relatively easy to right-size GPU instances. But who doesn’t like to make things even easier? That’s where CloudFix comes in.
With CloudFix, all of this shows up in the CloudFix UI as the EC2 GPU Optimize Manually finder/fixer. CloudFix finds the g4dn and P3 instances across your organization (read-only), alerts you if CloudWatch is not properly configured, and keeps checking Compute Optimizer for new recommendations. Low-risk recommendations are surfaced for your review, and nothing changes until you decide to act on them. You don’t need to write any code to take advantage of this new feature – it’s just there, ready to help you reduce AWS costs in just a few clicks.
While the quest for optimizing the price/performance of GPUs may not have changed since 1999, accomplishing it has definitely gotten easier. Whether you do it yourself or rely on CloudFix, run those recommendations and get ready to start saving.
To see how much you can save with CloudFix, including with the new right-sizing GPU fixer, check out our free, secure savings assessment.
Related Articles
- AWS Cost Optimization: The Complete Guide to Lowering Your Cloud Bill (2026)
- AWS Cost Optimization Tools: The Complete Comparison Guide (2026)
- RightSpend vs ProsperOps (Flexera): The Independent EC2 Discount Alternative
- Find Idle AWS Transfer Family Endpoints
- CloudFix Finder: SageMaker Rightsize Instances (Manual Fix)